Update: The Blob Storage team has implemented the Static Website feature. Please go check/try it out!
Problem
I would like to store and serve this web site on Azure Blob Storage. Here are the criteria:
- Everything should be served from Blob Storage (No App Services, No VMs, and no Azure Functions)
- Clean URLs (
blog.lifeishao.cominstead ofblog.lifeishao.com/index.html) - Uses HTTPS (because SEO)
Why?
Performance
If your website is just a bunch of static assets, it shouldn’t require a dedicated server to just serve your static assets. Removing the dedicated VM or a Web App PaaS takes the processing layer out of your static site, making it faster. On top of that, adding a CDN brings even more performance enhancements like compression and caching.
Cost
An App Services instance is around 40 dollars per month. While Blob Storage is only around 10 cents per month for a few MBs of storage. A premium CDN tier is 17 cents per GB served. You’ll come out A LOT cheaper if your site is served on Blob+CDN.
| Web App | Blob + CDN |
|---|---|
| $40/month | $0.20/month |
Challenges
After playing around with the possibility of serving the site using Blob Storage, I realized two issues.
- Blob Storage does not automatically set the correct
Content-Typeon the files based on the file extension. - Blob Storage does not serve a default file (eg
index.html) when you give just a directory path.
Step by Step
0. Generate a static site ready to serve
You should have a static site ready to serve. Take a note of where the entire site lives. If you are using Hugo or Jekyll, the generated site usually lives under the public directory.
1. Create Your Blob Storage
To Create the blob, Create a Storage Account, then select “Blob storage” under Account Kind. Make sure the Access tier is “Hot”.
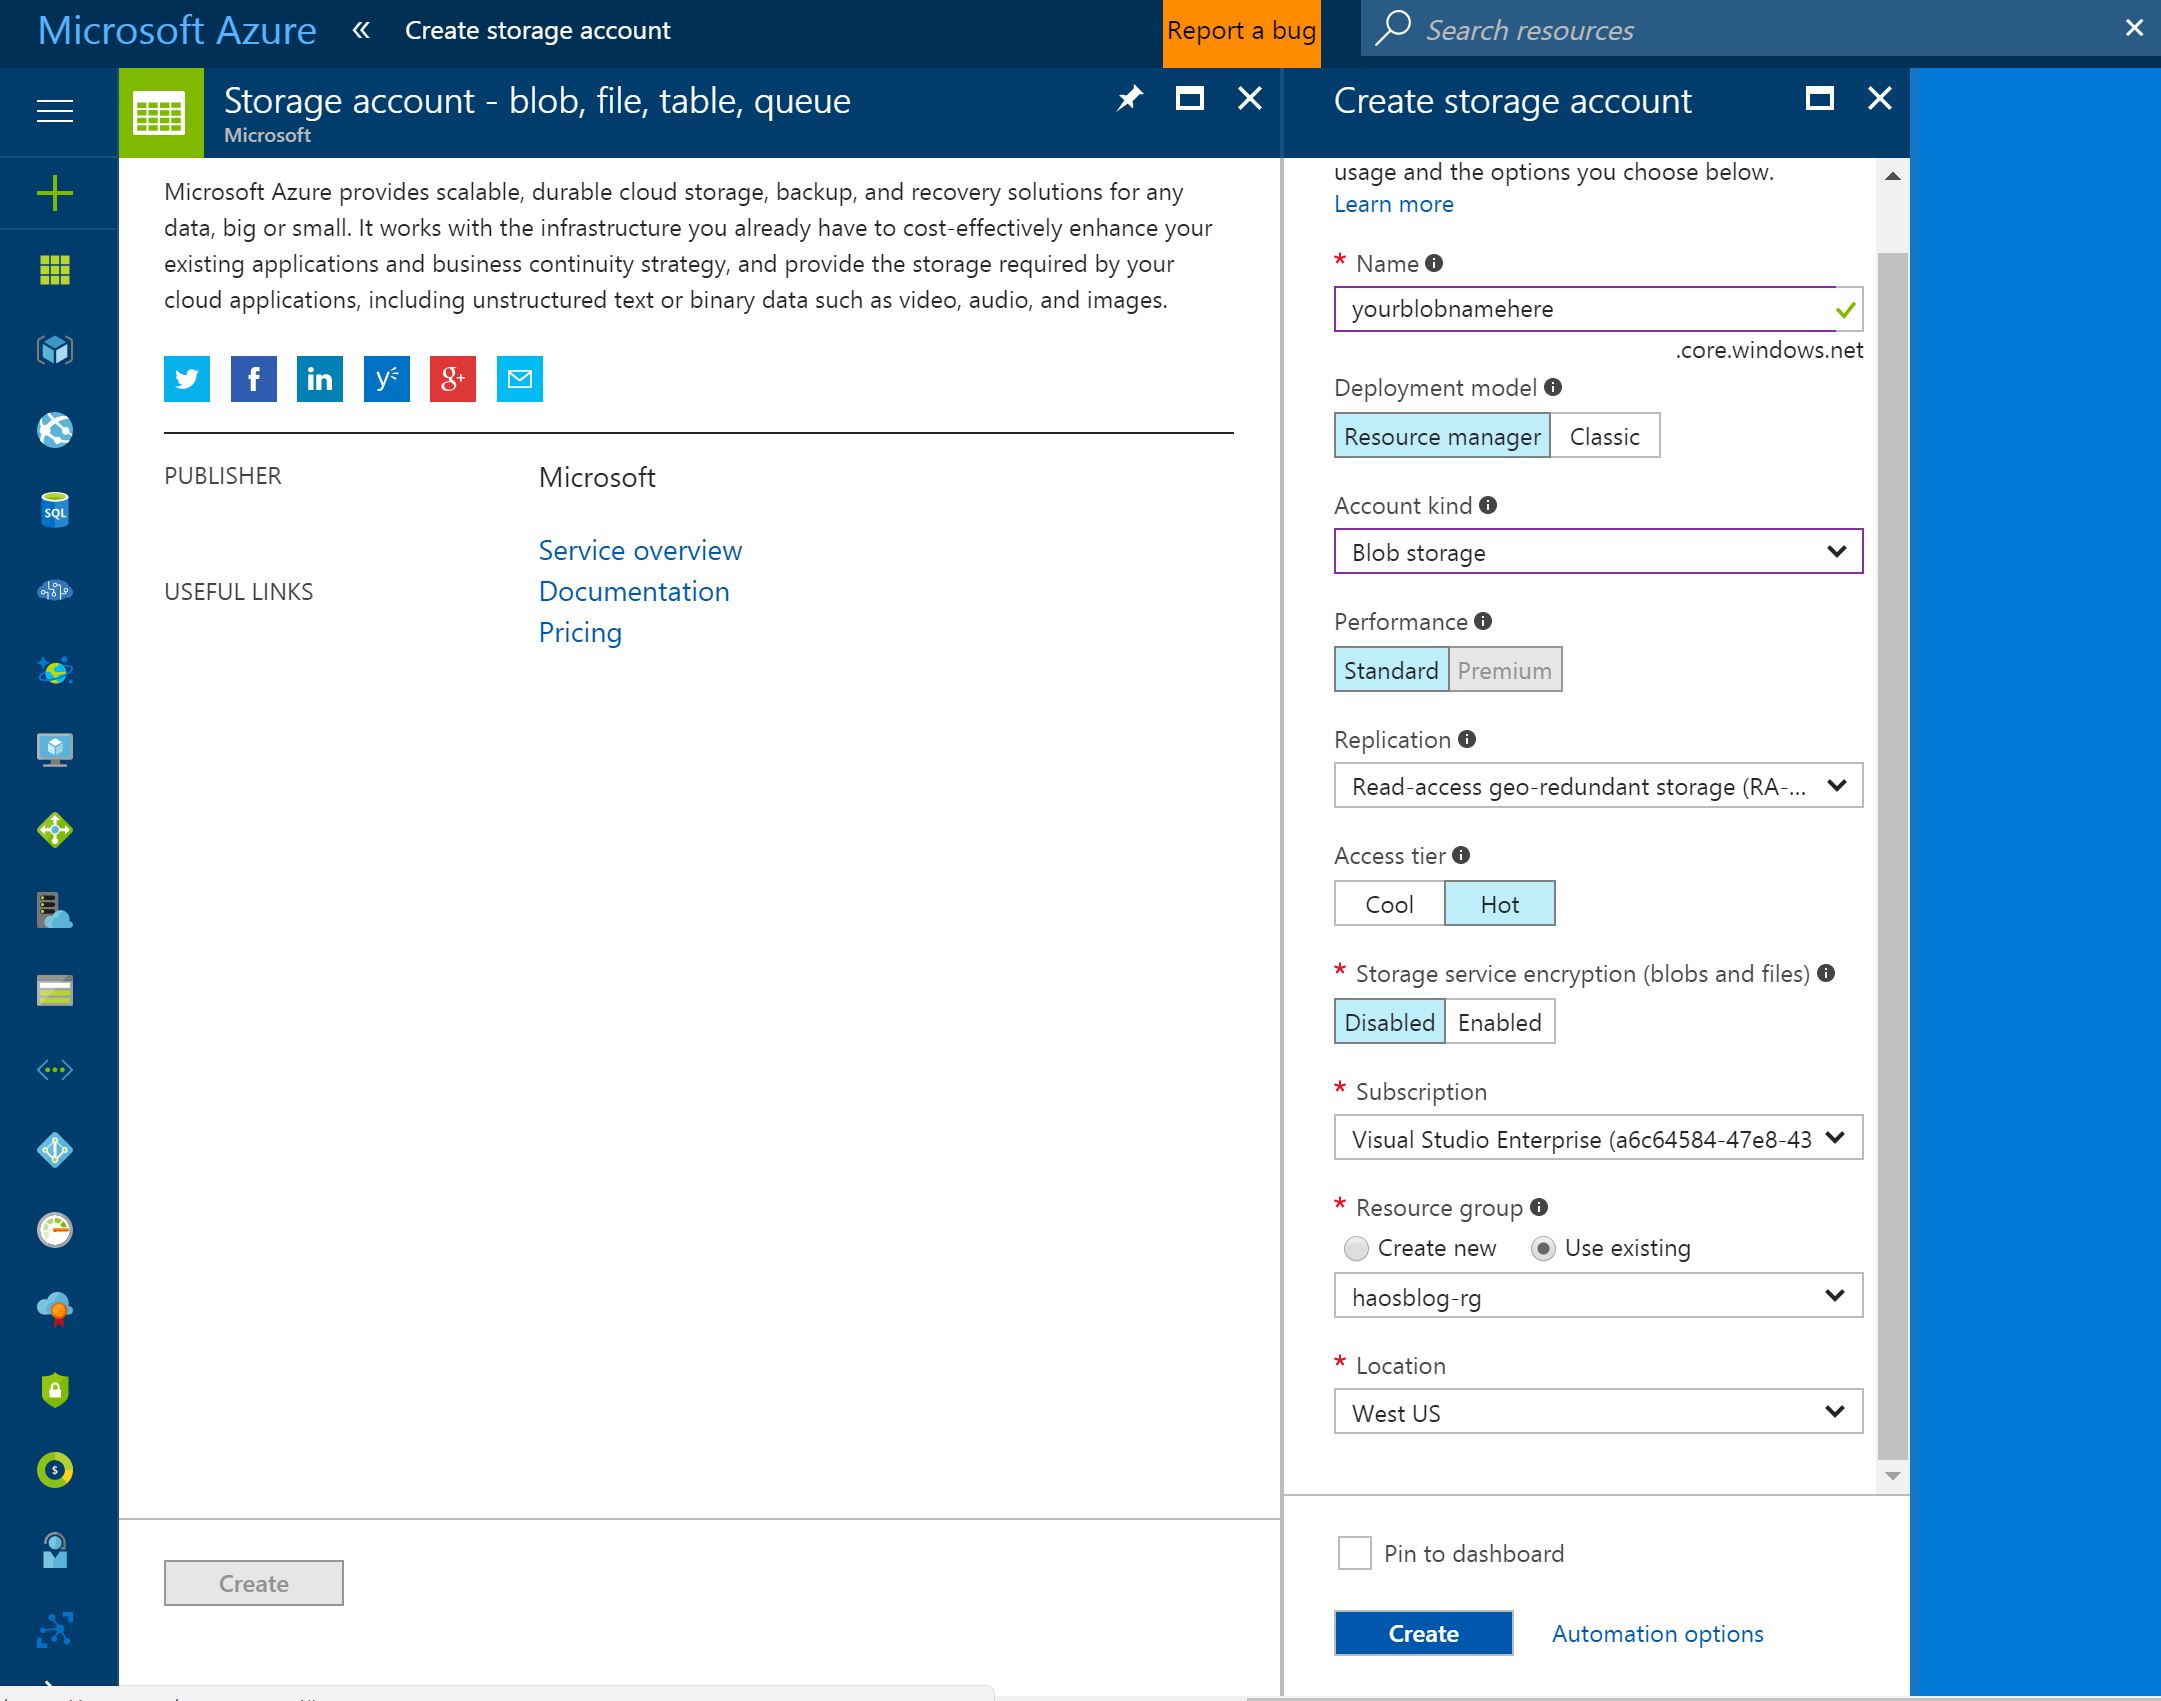
After your new blob storage is created. Go into the pane, and under Overview, click “+ Container”
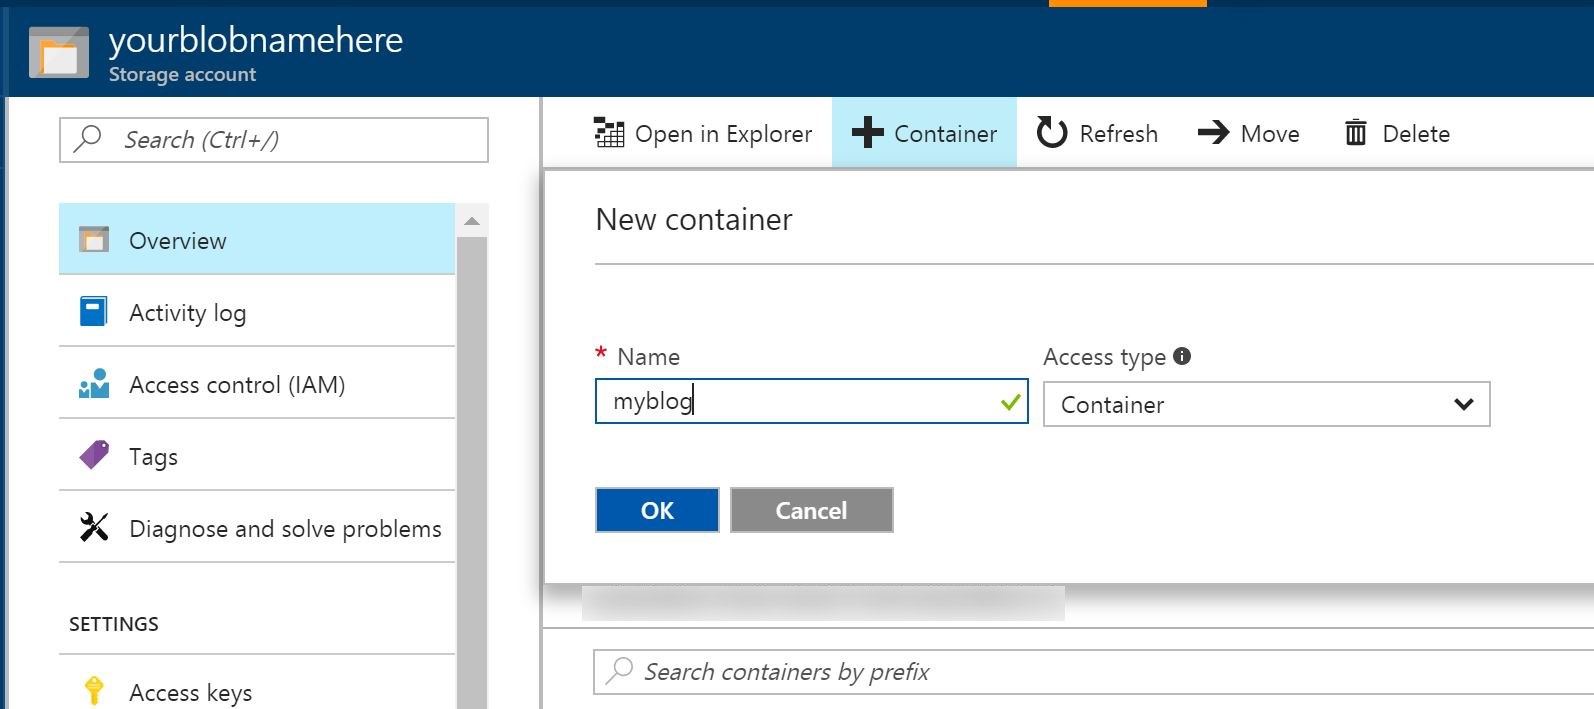 The Name can be anything but make sure the Access type is set for “Container”. In our example, let’s set it as “myblog”
2. Uploading Your Site with the Correct Content Type
Blob Storage doesn’t automatically set the correct MIME Type or Content-Type on the files and defaults everything to octet-stream.
When uploading to blob storage, you can specify what Content-Type goes with what file extension. To automate this, many docs refers using AzCopy, but AzCopy is only supported on Windows, so I opted for the Azure Cli 2.0 tool which is cross-platform.
For example, to set the content type for .html to text/html, the command is:
az storage blob upload-batch -s public -d public --pattern *.html --content-type text/html
-s is source and -d is destination
With upload-batch all the files will retain its directory structure in blob storage.
In order for this command to work, you’ll need to have set these two environment variables: AZURE_STORAGE_ACCOUNT and AZURE_STORAGE_ACCESS_KEY. Both of which will be under the Access keys in your Blob Storage Azure portal.
Important: Add
AZURE_STORAGE_ACCOUNTandAZURE_STORAGE_ACCESS_KEYto your system environment variables
I wrote a simple python script (same language as Azure Cli 2.0) to automate the command, and save the script as deploy.py in the root directory of my site:
# save as deploy.py
import os
import platform
import mimetypes
import subprocess

mimetypes.add_type("application/vnd.ms-fontobject", ".eot")
mimetypes.add_type("application/octet-stream", ".ttf")
mimetypes.add_type("application/font-woff", ".woff")
mimetypes.add_type("application/font-woff2", ".woff2")
mimetypes.add_type("application/font-woff", ".otf")
mimetypes.add_type("image/svg+xml", ".svg")

dir_path = os.path.dirname(os.path.realpath(__file__)) + "/public"

extensions = set()

for subdir, dirs, files in os.walk(dir_path):
    for file in files:
        filename, file_extension = os.path.splitext(file)
        extensions.add(file_extension)

for extension in extensions:
    mime = mimetypes.types_map[extension]
    command = [
        "az",
        "storage",
        "blob",
        "upload-batch",
        "-s",
        "public",
        "-d",
        "myblog",
        "--pattern",
        "*"+extension,
        "--content-type",
        mime
    ]
    print(subprocess.check_output(command))
This python script walks through all the files under public and inspects the file extensions and puts them in a Set (a collection of unique items). Then it iterates through the set and runs the az command on each file extension with its associated Content-Type using python’s mimetypes module.
Now your files are in your Blob Storage account. You can go to your Blob Storage Azure Portal to verify.
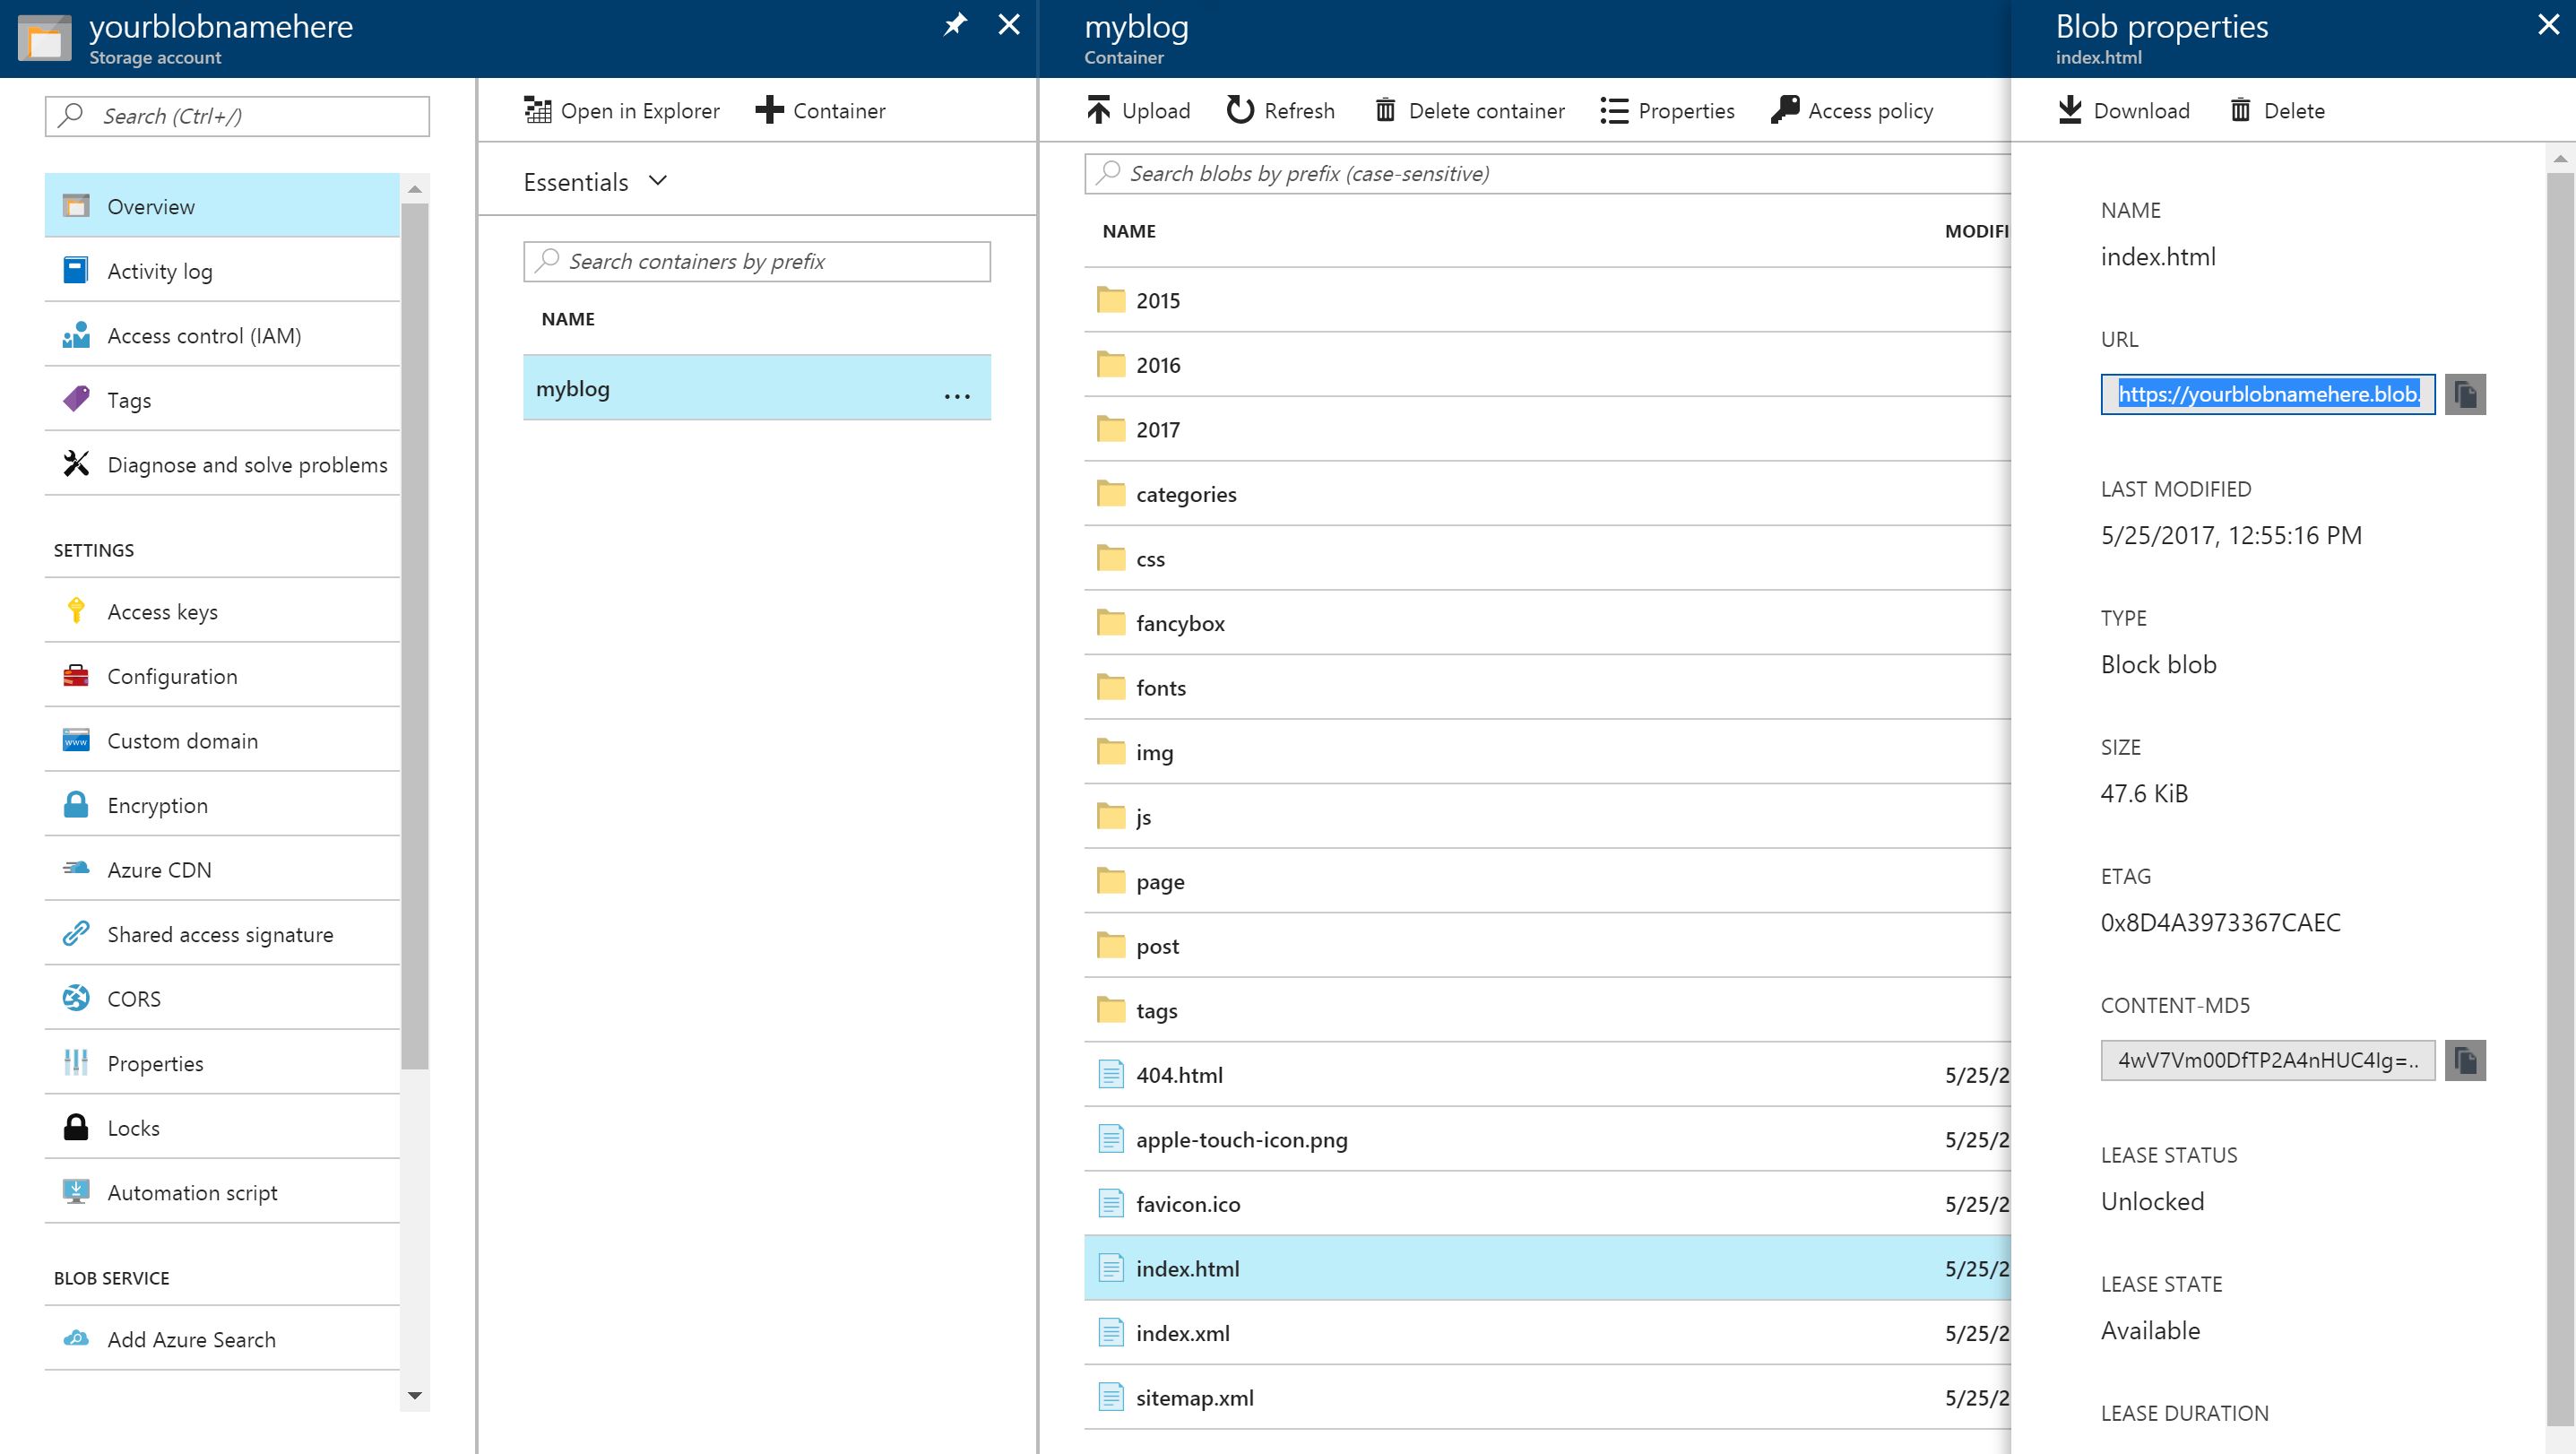
You can click on the index.html under “myblog” container file to open its “Blob properties”, and see the URL.
Note: if you go to the URL, you might see the content of the HTML displayed without any styles. That’s because the other assets are not being pointed correctly. We’ll fix that later.
Clean URL
At this point, you have an URL that you can hit and get the assets with the correct MIME-types. And you can even set up a custom domain which points to this blob account. It seems we are most there!
However, forcing your users to type blog.yourwebsite.com/index.html into the browser is NOT a complete solution. Specifically blog.yourwebsite.com and blog.yourwebsite.com/first-post should resolve to blog.yourwebsite.com/index.html and blog.yourwebsite.com/first-post/index.html, respectively.
In fact, the ability to serve a default asset when hitting a directory is the #2 most requested Blob Storage feature. And this feature request seems to be in a perpetual state of “Under Review”.
We can use CDN to get around this restriction by utilizing Azure CDN’s Rules Engine Feature under the Premium Verizon Tier.
3. Create your CDN profile
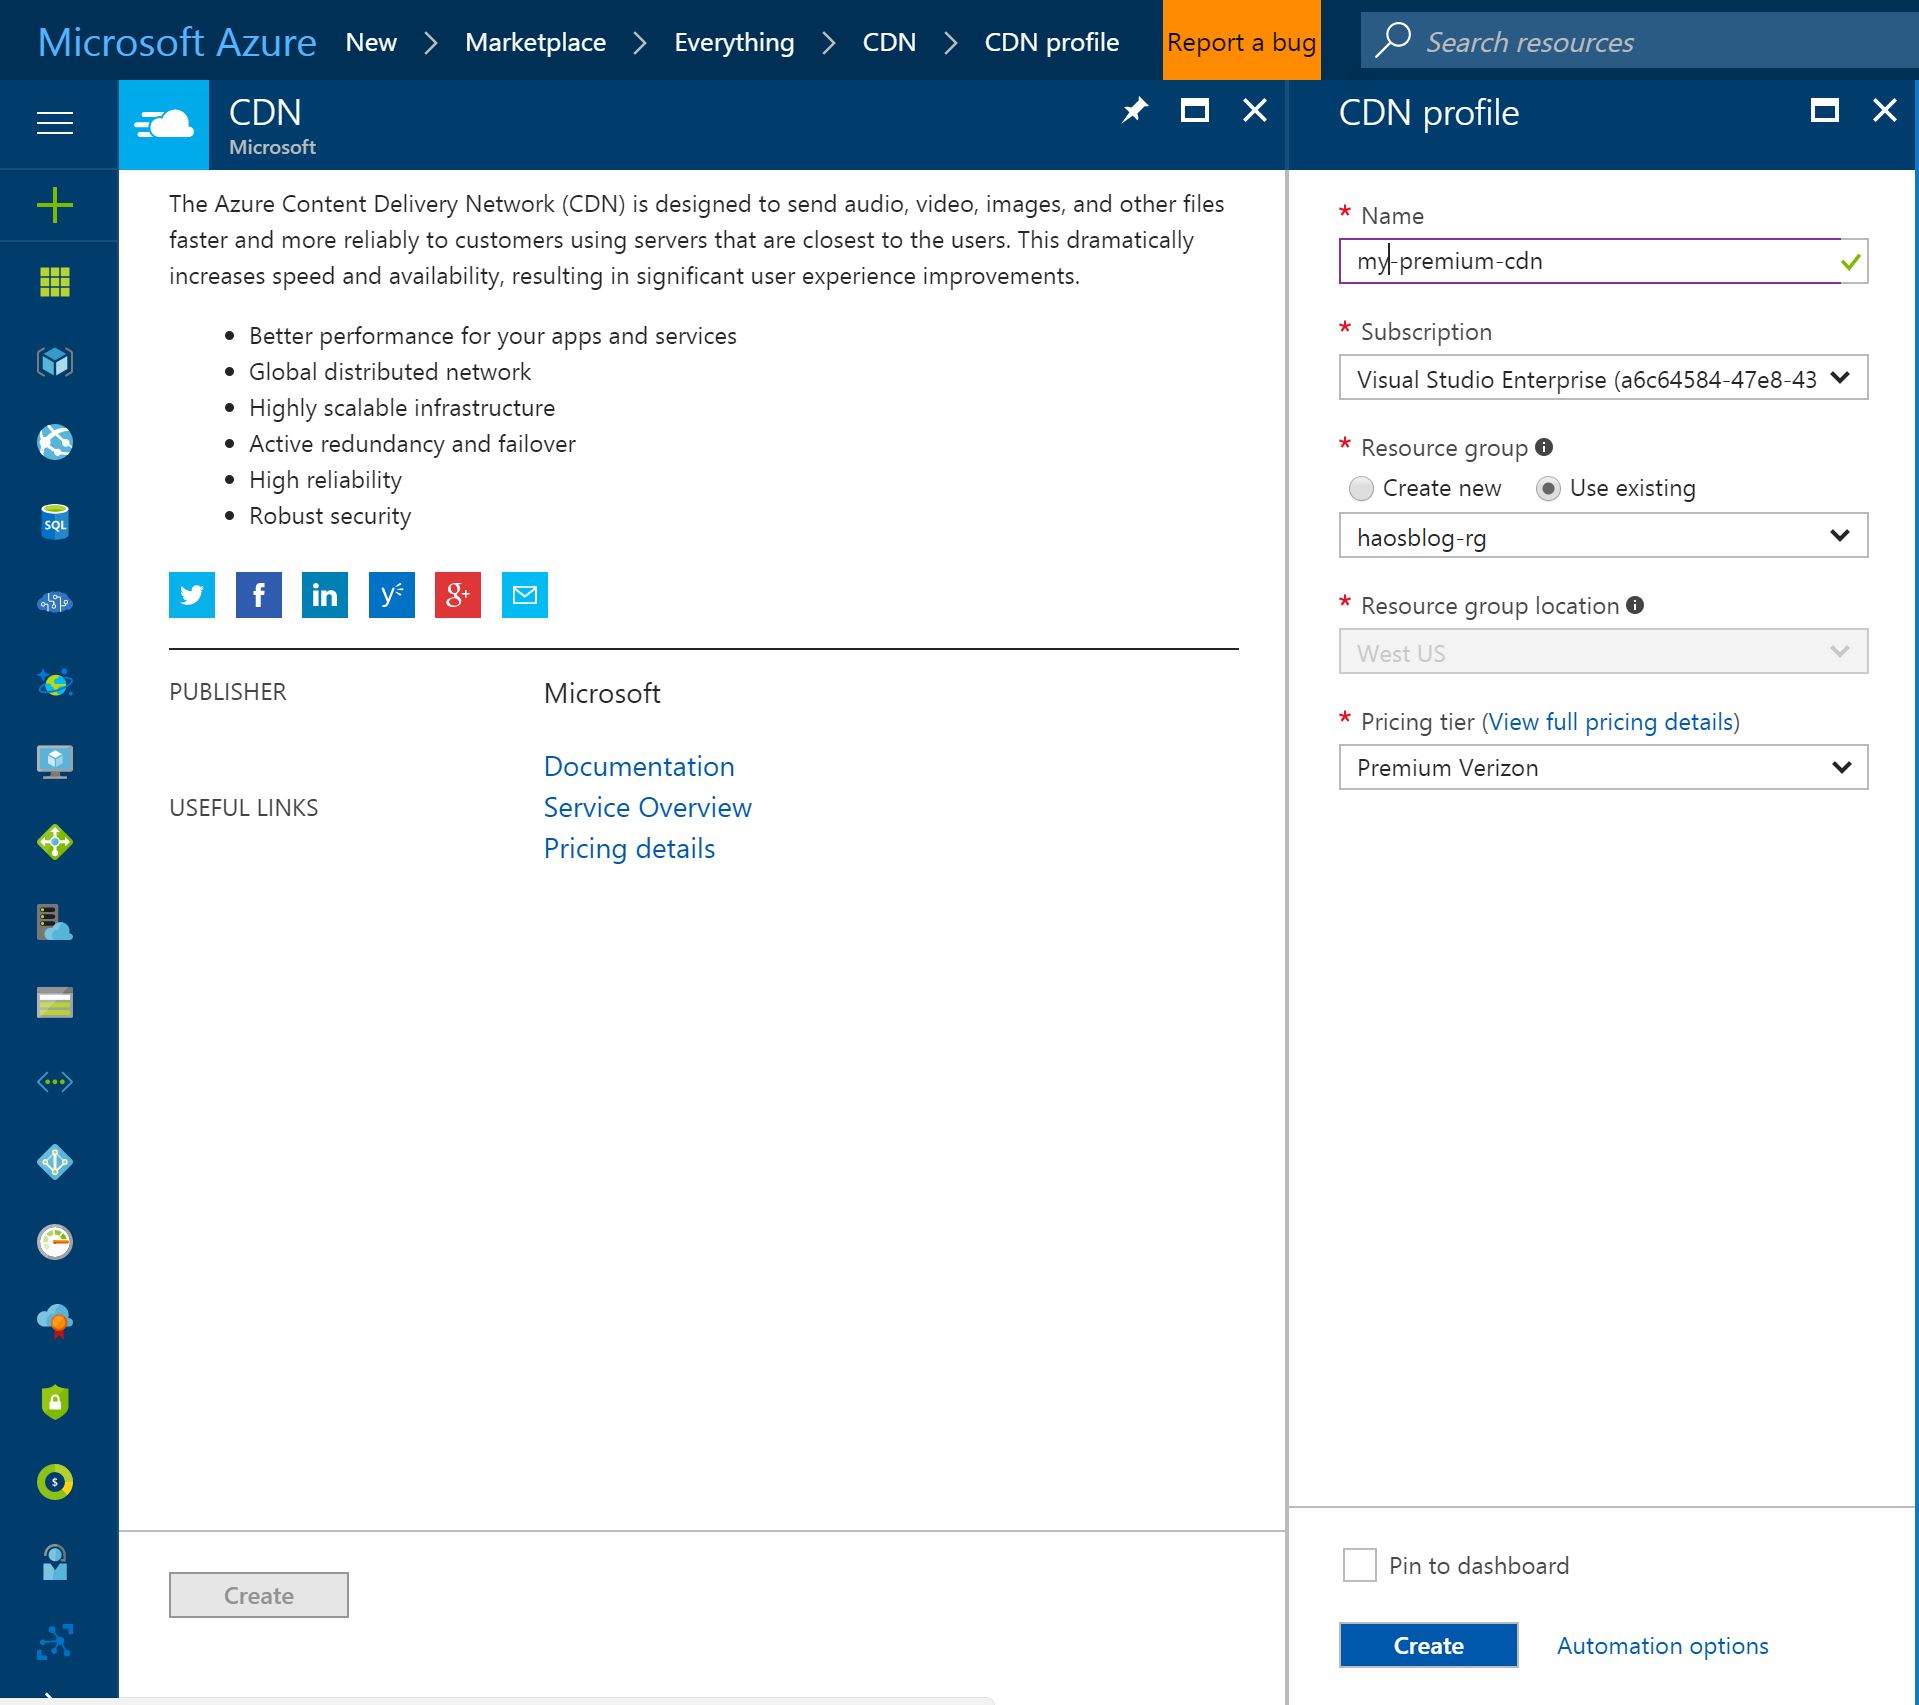
Make sure you create the premium tier cdn. This is the only tier that has the “Rules Engine” Feature.
4. Create CDN Endpoint
Under Overview in your newly created CDN profile, click “+ Endpoint”. Then you will see:
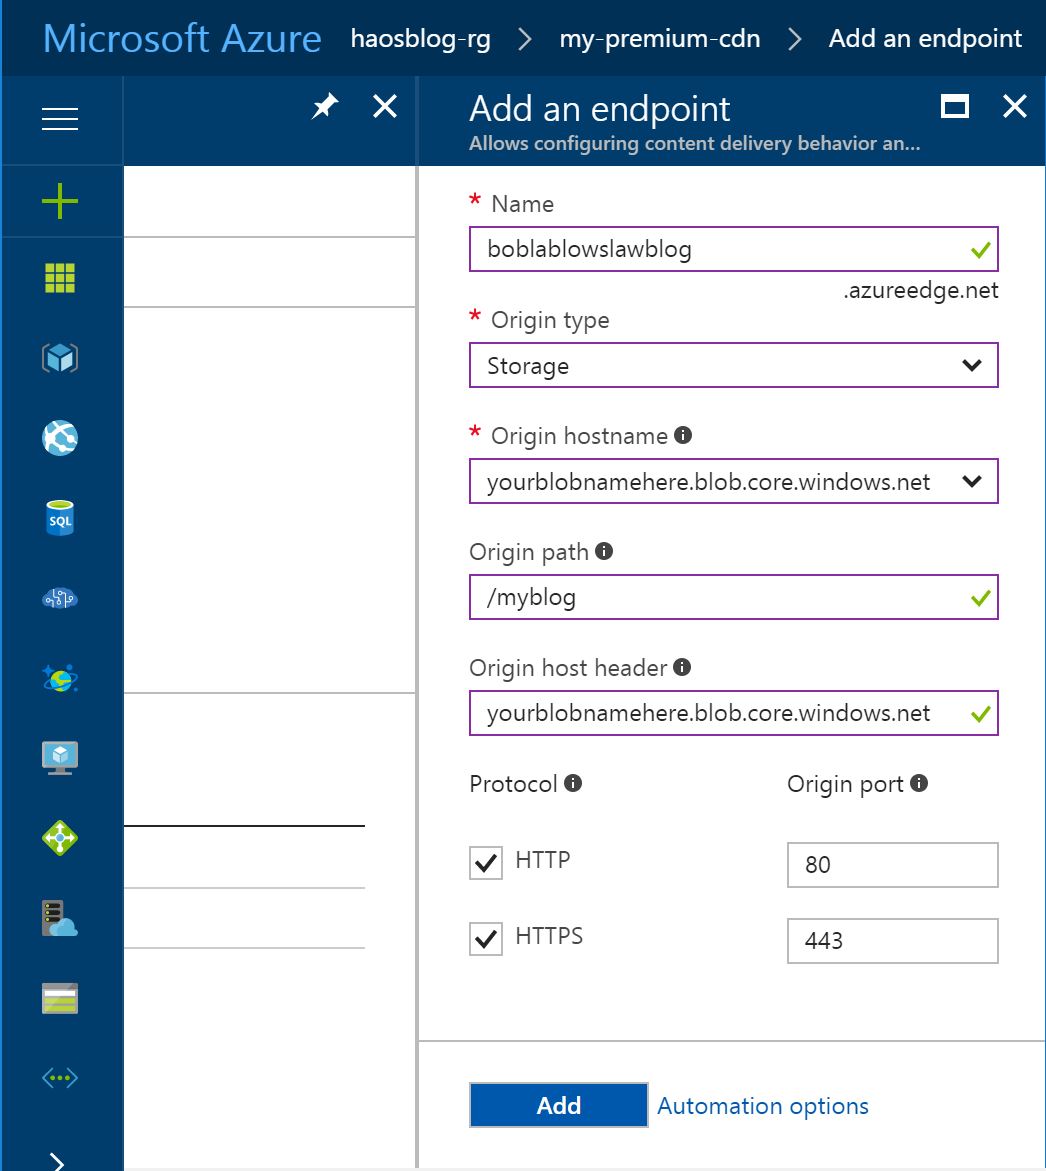
- Select “Storage” for “Origin Type”
- Select the correct Blob account you created under “Origin hostname”
- Set the “Origin path” to the Contain you created
5. Configure CDN Rules Engine
Go back to your CDN Profile Overview and click on Manage:
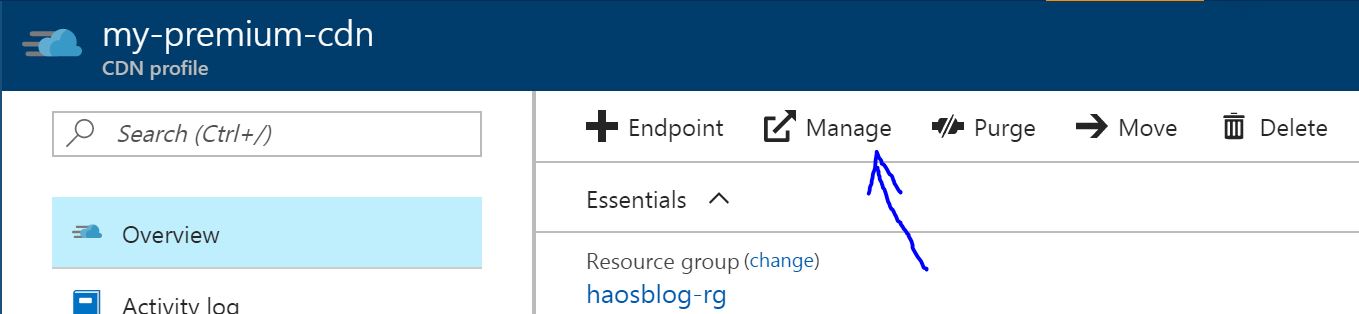
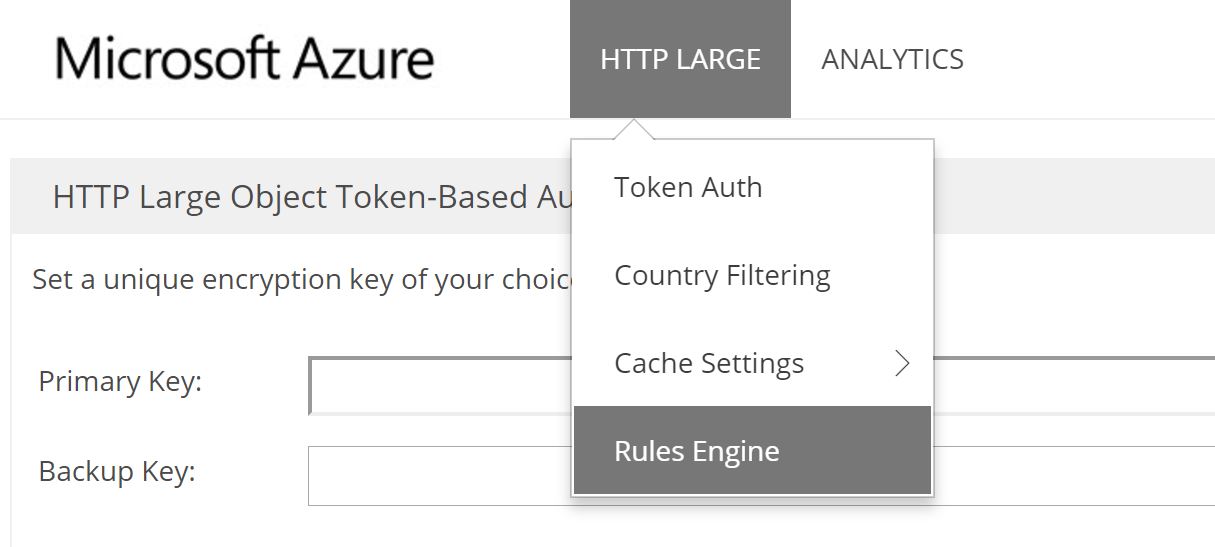
And you’ll be taken to another page with a ton of configurations. Hover over “HTTP Large”, and click “Rules Engine”.
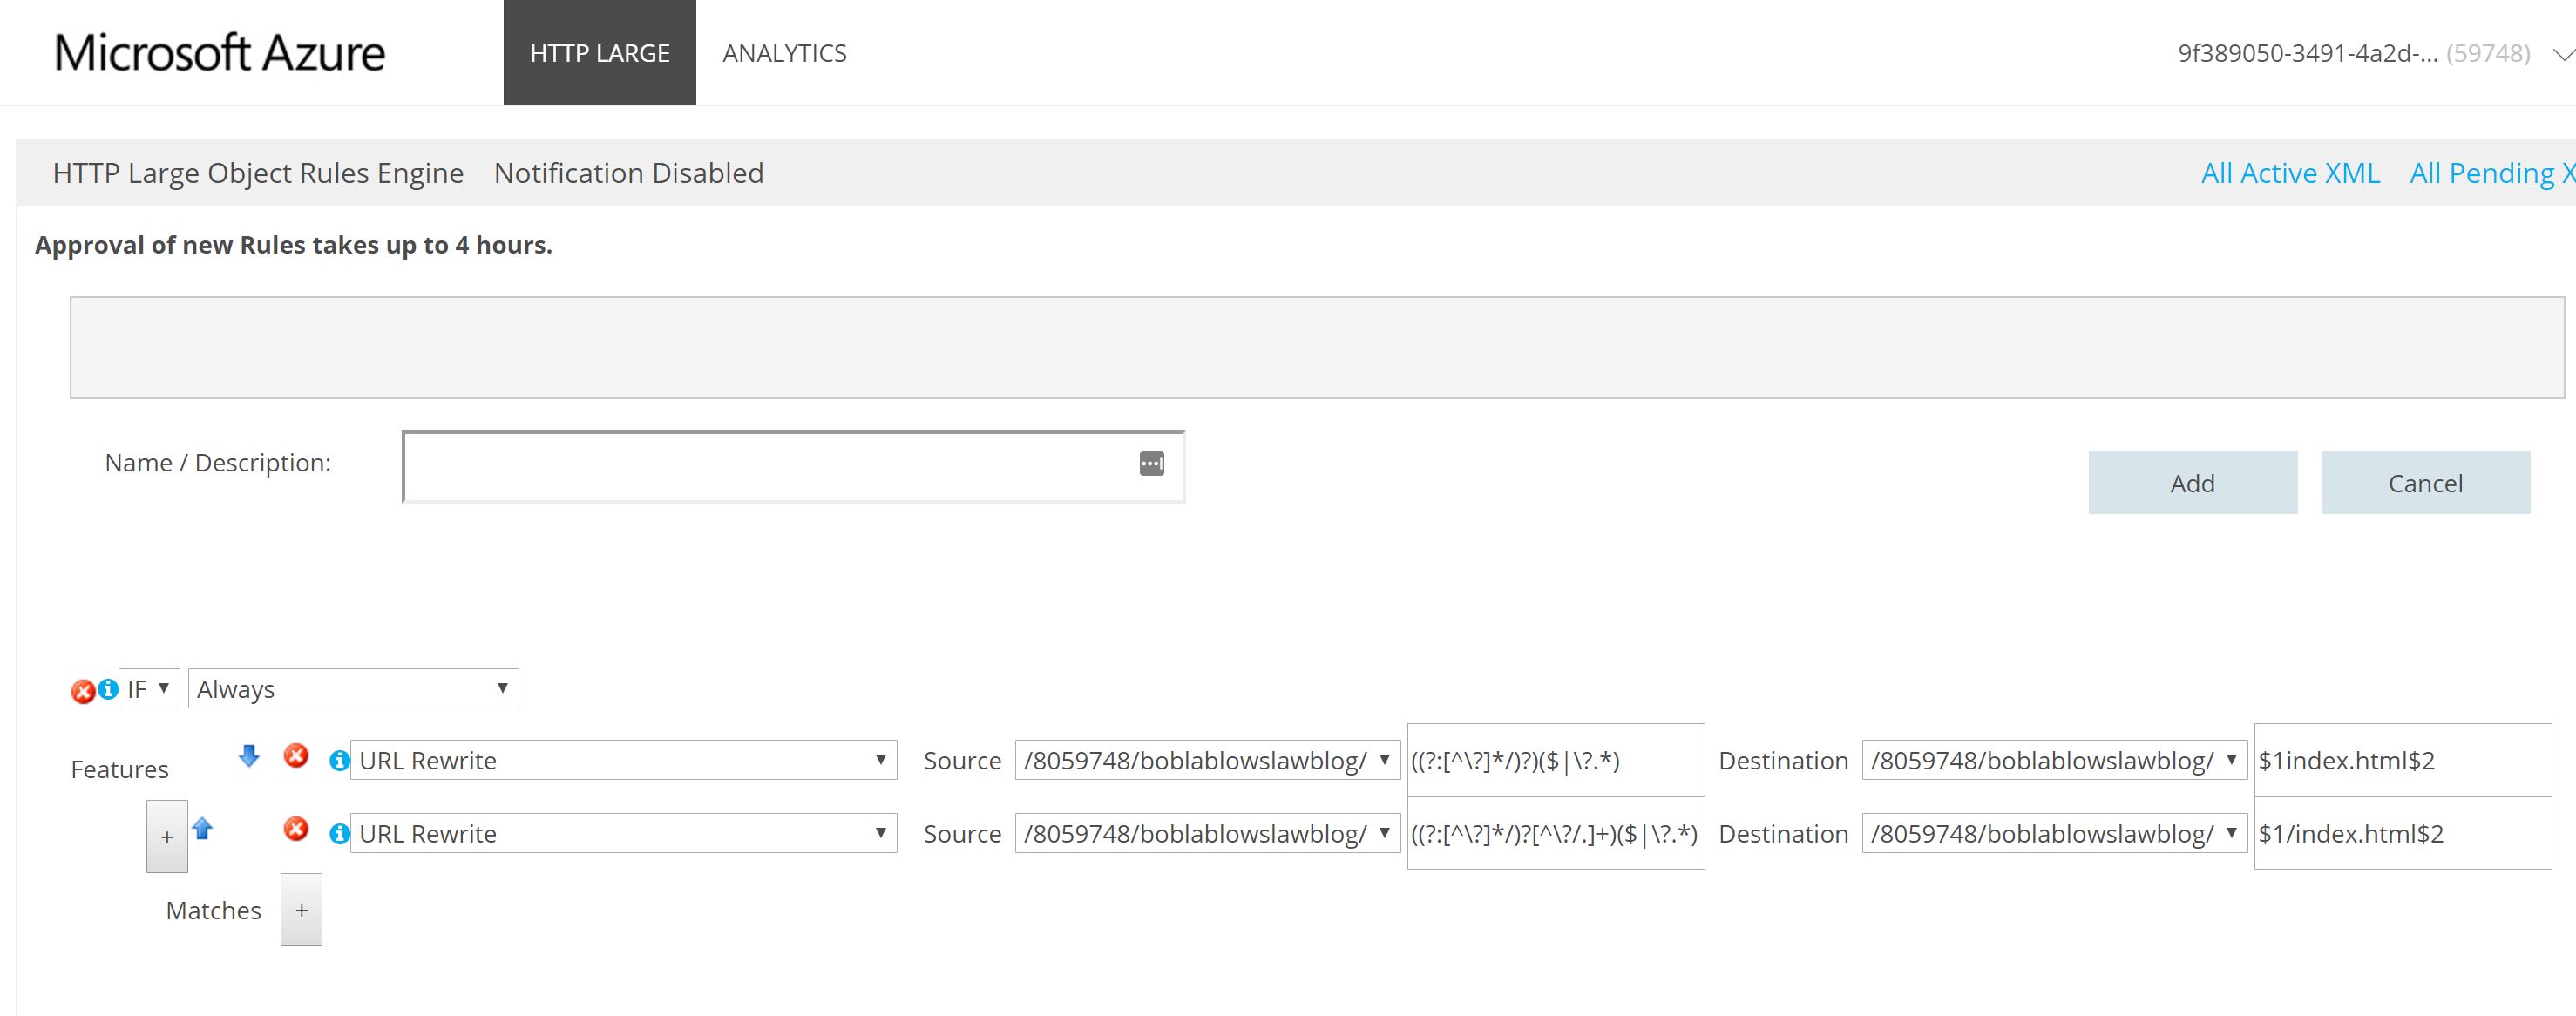
6. Add Your Rules
- Make sure the dropdown says “IF” and “Always”
- click on “+” button next to “Features” twice.
- set the two newly-created dropdowns to “URL Rewrite”
- set the all the sources and destination dropdowns to the endpoint you created (the value with the endpoint name)
- for the first source pattern, set to
((?:[^\?]*/)?)($|\?.*) - for the first destination pattern, set to
$1index.html$2(See what this rule resolves to.) - for the second source pattern, set to
((?:[^\?]*/)?[^\?/.]+)($|\?.*) - for the second destination pattern, set to
$1/index.html$2(See what this rule resolves to.)
The end result should look like something like this:
Note: if you would like
https://yourblog.azureedge.net/myawesomepost(without a trailing slash) to resolve tohttps://yourblog.azureedge.net/myawesomepost.html, you can set the second destination pattern to$1.html$2. The destination pattern in step 8 resolves the asset tohttps://yourblog.azureedge.net/myawesomepost/index.html. Of course, this means any resource without an extension will resolve to.html. You might not want this behavior, but there is no way for CDN Rules Engine to know what type of file you’re trying to request.
Then click the “Add” Button. It will take up to 4 hours for the setting to propagate to all the CDN nodes.
After the setting is “Active”, then you can access the site by going to your CDN Endpoint URL without pointing directly to index.html!
Aside: Simpler Rules
If you would like to simply resolve the top-level domain to its index.html, you don’t have to use messy regex.
You just have to create one URL Rewrite rule, and simply set the source pattern to $ and the pattern to index.html. (Thanks @RichyLi for pointing this out).
7. Purging your CDN
you can use the az tool to purge your cdn.
First you’ll need to install it as a module by running az component update --add cdn
Then you can run az cdn endpoint purge -g your-resource-group -n your-endpoint --profile-name your-cdn-profile --content-paths '/*'
Next Steps
Custom Domains
You can set a custom domain by setting the CNAME of your domain to point to your CDN endpoint. Then set the domain in the Azure Portal.
One caveat is the custom domain for your CDN cannot be a root domain. This means your site has to have a subdomain like www.yoursite.com or blog.yoursite.com
HTTPS
Once you have the custom domain setup. The Azure CDN gives your custom domain a free SSL certificate. If you enable SSL, Azure will look at your WHOIS and send you an email verifying that you own the domain, then issue a DigiCert certificate with the subdomain you specified.
It then takes 8 hours for the certificate to propagate to its CDN nodes.
Continuous Deployment
Read the next post on CI with Travis